The misfires in the Browning BL-22 were caused by a locking plate that was no longer within the correct dimensions. This issue is well documented on this website.
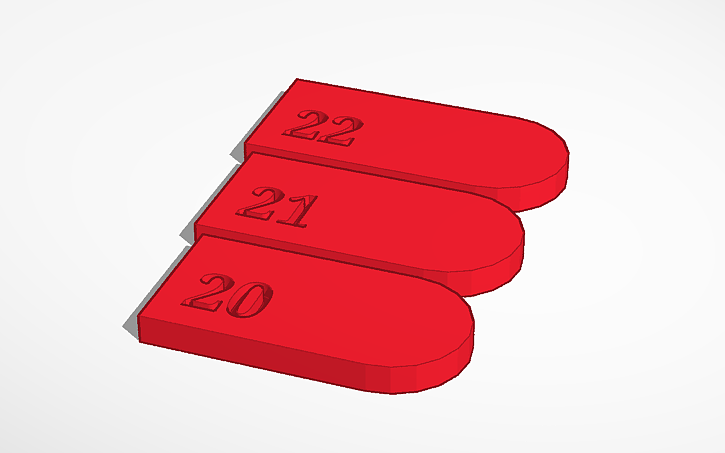
At one point, I 3D printed a few test plates, which made it easy to measure and determine the proper dimensions needed to eliminate the excess play in the bolt.
You can print these plates yourself and fine-tune their size until the gap between the barrel and the bolt is completely eliminated.
First: You cannot reset it, you will have to get yourself a used head unit to fix it. Second: The anti-theft protection needs to be cleared at a garage who can enter the VIN number in the head unit. Only then will the constant beeping stop. There are tools available for this which I have not tested. I am refering to this video and he seems to be using this tool [1] [2] and software for it. Third: The new head unit is from a 2018 model C3 and offers functions that this 2017 model does not support. For example, the new unit offers a start-stop function but the original did not. This will then not add this function magically to your car.
Warning:
While this is a super easy job to do, you will do it at your own risk. Think before applying force. Think before doing something permanently.
Parts required:
A similar or compatible head unit (navigation computer)
My old head unit shows the following data on the label:
Remove the two torx 20 screws that are facing you. One on the left, one on the right.
Carefully pull the unit out. You have some slack in the wires, so you can guide them out with your fingers. Do not pull too hard!
Visualise which color plug goes where. The top two ones, blue and orange have a purple line on them. Under those two, you find a blue one. Check in which of the two connectors it is connected to. Next to it is a green one and under that is a black one. And next to the black plug is a white one.
Start with the blue/purple, then orange, then blue, then green, then black and lastly the white one.
Remember in which port the blue plug was plugged into.
Finally, you see a big plug that is held in place by a retainer. Carefully undo the retainer by turning it sideways and take the plug out.
That’s it, now do the thing in reverse with the new head unit.
Next, you need to program the VIN from your car into the radio or it will keep on beeping. It will not end until this is done.
I found in my notes from 2017 a method to fix the header of a M4A file. Appartently I needed this back then to repair a file, and then forgot about the note. So here ya go:
ffmpeg -f aac -analyzeduration 100M -probesize 100M -i broken.m4a -c copy fixed.m4a
The inside of the action of a browning bl22 rifle. The insert can be seen in the “roof” of the action.
It is the second time that I have to fix this issue where the trigger fails to release the hammer.
Symptom: The lever is not closing completely and then you cannot pull the trigger.
Cause: There is a small piece of steel in the “roof” of the action that has come loose and slides forward.
Fix: Fix the steel insert in its place, now with a much stronger adhesive. I used Loctite 648 this time.
Okay, first you need to make everything super clean and free of grease. Then you sand the slot with some fine sanding paper first as another cleaning step and then you use a coarser sanding paper to roughen up the surface.
Look at how nice and clean that has become 🙂
Next, clean the insert thoroughly and use fine sanding paper first, then coarser paper.
The cleaned insert.
I chose for a stronger loctite this time, because I want to wait with more intrusive ways to affix this part. Have I noted that this part should never have come out in the first place? It’s not even noted in any parts list…
Maybe this grade of Loctite is good enough. If not, then we go back to the drawing board.
There, all fitted together and now I will give it plenty time to dry and cure. Was briefly pondering about heating it up, but that’s a bit of a weird thing to do with glue as you can also often use heat to undo glued together parts.
Will it stick?
I’ll go try it out tomorrow with some beefy ammo. I bought CCI EX Stingers that will yeet the nope with 1640 feet per second. If that breaks the glue bond, I’ll have to figure out another way to affix the insert.
After cleaning out my Browning BL22 and replacing some springs, I experienced an issue with the lever on a regular basis. I took it apart again, checked everything, only to have it re-appear again.
Then I noticed that a small plate in the roof of the rifle’s action housing had come loose. After some investigating, I deduced that this was a part that should not move around. Especially since I discovered that I could visibly see the plate when the issue occurred and by pushing it back, I could resume shooting. Another pointer was, that this particular part does not occur in any parts list.
The correct position of the plateThe plate itself, which does not appear in a parts list.
This is how it looks when the plate has moved then then causes a lockup:
So I decided to use some Loctite 242 to lock the plate in place and now time will have to tell whether this works or not.
The Koonlung K1S is a very nice dashcam, with GPS, emergency button and HD recording and everything is made quite small. The HD video has a bit of a low bit rate, but it’s still not bad.
That said, it became a piece of rubbish. No matter what kind of SD card is inserted, the software locks up and the whole device becomes useless.
The Koonlung K1S Dashcam
I have tried all the versions of the firmware [⇓1]. I have tried to decompile the firmware [⇓2][⇓3]. Nothing worked, whatever I tried.
So the time has come to take the thing apart. It cannot be any more broken than it is now, so maybe it is a blown cap or something? It is not, by the first look. There seems to be a corroded button cell soldered onto the motherboard.
Hmmm, is this a corroded button cell?This seems to be at least a problem.
Alright. So what model is it? It’s not like you can just take it out and read what’s stamped onto it. Luckily I have a reference sheet in my archive that can be helpful. Hooray for being a data hoarder? >_>
The diameter is 4.8mm and the height is 2.0mm. The height is somewhat debatable as everything is small and kinda hard to reach. According to my datasheet, there are two candidates as a replacement battery:
4.8 x 2.15 – 1.55V – Maxell model: SR421SW – Seiko SB-A6 – Citizen 280-77 – GP 348
4.8 x 1.65 – 1.55V – Maxell model: SR416SW – Seiko SB-A5 – Citizen 280-75 – GP 337
As I want to get the exact battery, I grabbed a mini caliper and measured 1.65mm. There we go. It will be a SR416SW or anything compatible.
€5,46 has been paid for a set of 10 batteries because it was impossible to buy just one and now it is time to get the battery out.
[root@conrad ~]# apt-get autoremove
Reading package lists...
Building dependency tree...
Reading state information...
0 upgraded, 0 newly installed, 0 to remove and 0 not upgraded.
1 not fully installed or removed.
After this operation, 0 B of additional disk space will be used.
Setting up fuse (2.9.3-15+deb8u3) ...
Creating fuse device...
/run/udev or .udevdb or .udev presence implies active udev.  Aborting MAKEDEV invocation.
chmod: cannot access '/dev/fuse': No such file or directory
dpkg: error processing package fuse (--configure):
 subprocess installed post-installation script returned error exit status 1
Errors were encountered while processing:
 fuse
E: Sub-process /usr/bin/dpkg returned an error code (1)
I have no idea why my fuse got bonked, but I simply made a folder named fuse in the dev folder and everything works as intended again.