I am trying to connect the official app to it and it cannot detect the speaker. Assuming that the software is written correctly, I think that the inside of this speaker differs from the original. Oh well!

![]()
Failed and working projects, notes etc.
I am trying to connect the official app to it and it cannot detect the speaker. Assuming that the software is written correctly, I think that the inside of this speaker differs from the original. Oh well!
![]()

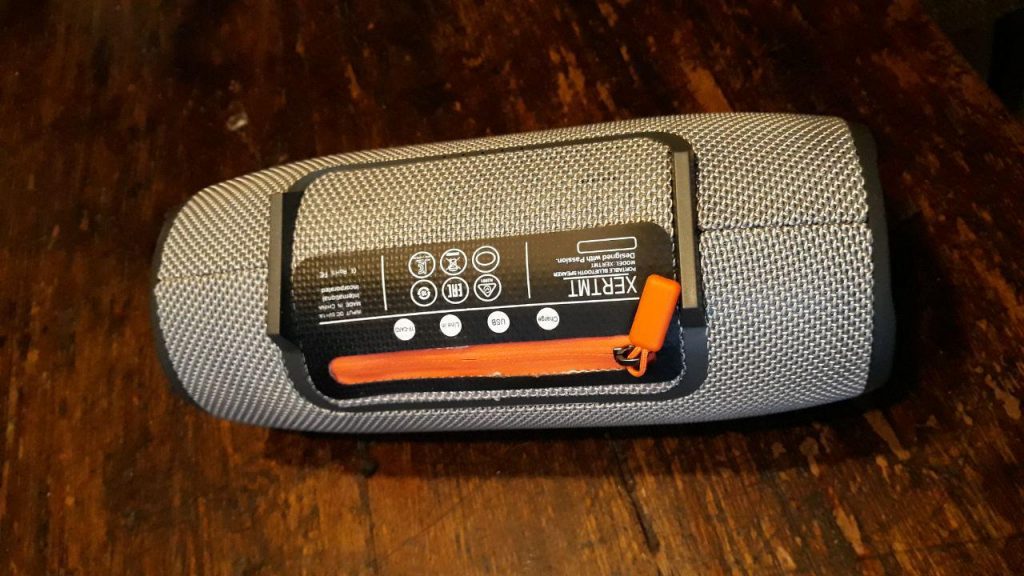
I promised to make a few more pictures of this fake JBL. I say fake somewhat hesitantly, because it’s quality is extremely good. And with that I am referring to the shell and its finishing. The logo has not been glued on straight but hey, what can you expect.

Sound quality is something I can’t really judge. I had the impression that the JBL speakers were bass monsters, but this one doesn’t really seem to have a good oompf. I do not have an original speaker to compare it with, unfortunately.
Another interesting thing is the labeling of the device, manual and the box. On the bottom of the device, you can read “XERTMT”:
The box, on the other hand, reads XTEMRE:

While the name on the manual is EXTEME:

Quite literally the only time they had it right. So what’s going on here, because if you copy a box, simply copy a box! And don’t make additional typos like “rtable Wireless Speaker”.
So is this a fake or this this a rejected batch of a production once ordered by JBL? I know from an old friend that you have to check every thing that comes out of a Chinese factory so you can be sure your customer gets what he or she pays for. But it’s a fake. Of course. 😉
It also comes with two matching cables, one aux and one usb.


And a carrying strap!

So did I score a JBL for 19 euro? I have no idea, because I cannot open the product without damaging it I think. No, I’ll post the pictures of the inside soon.
![]()
This is part one of the Flea market Mystery Family search. My goal is to locate this family and literally ask them if they are missing a box of film reels.
So far, I have digitized 8 reels and shreds of film. But first, let’s write down the first findings so far:
The list of reels that are now digitized are:
You can watch the videos on my Youtube channel here: LINK
![]()
A few years ago we spotted a box with film reels. We looked into the box and we could read labels with births, birthdays, marriages and holidays.
Interesting stuff if you are into mystery things and especially when you realize that it’s someone’s or some family’s life! How does something like this end up on a flea market? The sellers of the box were not even the original owners and had no idea where it came from.
I asked them what they wanted for the box and I had to pay one euro. Just one euro. So I bought it immediately and managed to score a Super8 projector from my employer. This projector is not capable of picking up the sound track, but so be it. If I find a more luxurious projector for a bargain, I will go get that.
In the next episode, I will tell you how much information I have gathered so far.
![]()
Quick and dirty, still need to test it.
imapsync --host1 SOURCE_URL_OR_IP --user1 --password1 host2 DESTINATION_URL_OR_IP --user2 --password2
Next you will see how a simple command is written.
My source is hosted at mail.website.tld and has a mailbox with username “user@website.tld” and password “macaroni”
Now I don’t want my client to have any troubles with having to enter a new password and such, so I set up the mailbox on the new server with the exact same data.
The new server has the IP address “111.222.333.444” and has been set up that the new mailbox is using the same credentials.
Your command will now look like this:
imapsync --host1 mail.website.tld --user1 user@website.tld --password1 macaroni --host2 111.222.333.444 --user2 user@website.tld --password2 macaroni
A lot of text will fly by now and you will see that the mailboxes are synching. If you get “Detected 0 errors” at the end, all went well.
Now proceed with the other mailboxes and then you can make the change in the DNS to make the mailboxes on your new server available.
![]()
apt-get update
apt-get upgrade
apt-get install git libjson-webtoken-perl libauthen-ntlm-perl libcgi-pm-perl libcrypt-openssl-rsa-perl libdata-uniqid-perl libfile-copy-recursive-perl libio-socket-inet6-perl libio-socket-ssl-perl libio-tee-perl libhtml-parser-perl libjson-webtoken-perl libmail-imapclient-perl libparse-recdescent-perl libmodule-scandeps-perl libreadonly-perl libregexp-common-perl libsys-meminfo-perl libterm-readkey-perl libtest-mockobject-perl libtest-pod-perl libunicode-string-perl liburi-perl libwww-perl libtest-nowarnings-perl libtest-deep-perl libtest-warn-perl make cpanminus
cd /home
git clone https://github.com/imapsync/imapsync.git
cd imapsync
chmod +x imapsync
./imapsync
cpanm File::Tail
cp imapsync /usr/bin/
Done!
Item 10 is to make sure you can use this command anywhere on the server. Have fun!
![]()
Step 1.
Pour yourself a mug of wine. Don’t be silly by taking a fancy glass. Pour it in a mug. Have a sip of wine.
Add the sugar to the lukewarm water and then crumble the fresh yeast into the water as well. Give it a good stir and make sure all the yeast is dissolved. Now let it rest for 5 minutes.
Step 2.
Pour 200 gram of flour in a bowl and add the glass of yeast water. Then, mix it all together and knead it all into a ball. Next sprinkle some flour onto the kitchen counter or table. Knead the ball of dough for another 5 minutes firmly on the table and when it becomes too sticky, add A LITTLE flour.

Step 3.
Now, let the dough rise for 15 minutes at room temperature. Let it grow! Have a good sip of wine in the meanwhile.
Step 4.
Flatten the dough out a little and then start rolling it into a circle or square. This depends on your tray or dish you will put your pizza on. Make it really thin! Don’t bother about those bready pizzas. Make a proper one or leave.
If you have dough left after making a thin sheet, put it in cellowrap and put it in the fridge for tomorrow.

Step 5.
Apply plenty flour to your baking tray or dish. Next, drape the dough over it. Then cut off the excess and add that to the rest you may have already wrapped in the cellowrap.

Step 6.
Have a sip of wine. Add tomato sauce and spread it out with a spoon. Make sure you cover the dough plentifully. Next, add the italian herbs at an amount you feel comfortable with. Add some salt on top of it all.

Step 7.
Chop up the onion and garlic to small bits and sprinkle it evenly over the tomato layer.


Step 8.
Slice the mushrooms in thin-ish slices. If you want thicc slices, go for it, baby. Next spread them evenly over the tomato sauce and don’t show the audience that you have a light form of OCD. OCD OCD OCD OCD.

Step 9.
Next, add slices of salami to the layer. I have cut it in stripes, because I felt like it. Also, it creates less of a lava slide later on when you bite into a huge slice.

Step 10.
ADD CHEESE.

Step 11.
Slide the pizza in the oven and set the timer for 20 minutes. When the 20 minutes are over, check on the pizza. It usually can take another 5 minutes.
Meanwhile, drink more wine!
Enjoy!!
![]()
Totally by accident, but it just happens to look nice all together. Please, don’t be a dick and use this pic without letting me know. I don’t care for money, but I would like to know what it is used for. Thanks. (it’s kinda blurry anyway)

![]()
Ordered this for 18 euro in China and the sound is reasonable. But I would have expected a better bass though. I just had to buy it to see what kind of a copy this was.
I will add some more pictures in a following post.


![]()
I, for example, want to have it delivered to a gmail box, so i do the following:
Click Save and you’re set.
![]()